2016 is here, and perhaps you’ve set some goals for yourself this year. If eating healthier is on your list, then you’ve come to the right place to check out some new recipes!
We have chosen to showcase recipes with delicious healthy carbohydrate substitutions and other additions to improve nutrient intake, and reduce the amount of sugar! We also wanted this post to share easy recipes that keep you eating healthy!
On this post you will find recipes for cauliflower crust pizza, zucchini Pad Thai, black bean Brownies, and easy on-the-go egg muffins!
Now let’s start with the first meal of the day: Breakfast!
Easy on-the-go Egg Muffins
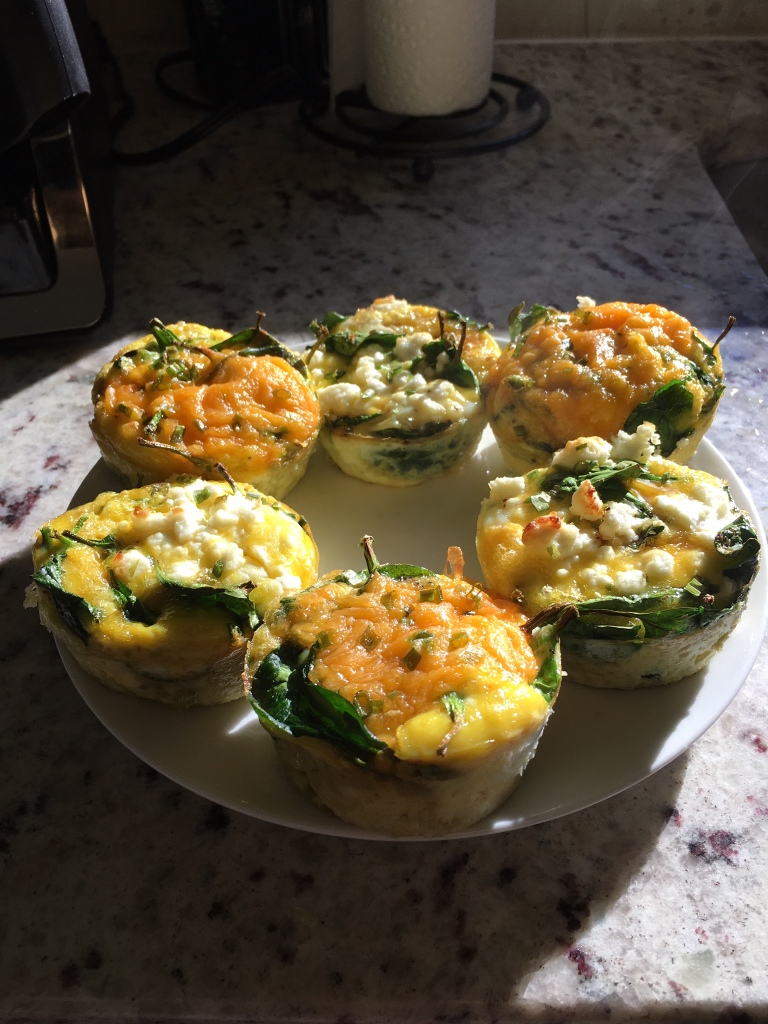
These pretty little muffins make a great, filling breakfast. The best part is that you can make them ahead, and heat them up just before running out the door!
These egg muffins contain organic eggs, spinach, cheese and herbs. If you need a little more flavor, or prefer meat with your eggs, crumbled bacon or sausage would make a nice addition as well! Try to use organic, cage free eggs when you can!
These are so easy. There isn’t a specific recipe that I follow as I have been making these for quite a while, but I usually make 6 at at time. That’s three days of breakfast!
I always begin with 8 eggs.
Crack those eggs, throw them in a bowl and whip em’ up!
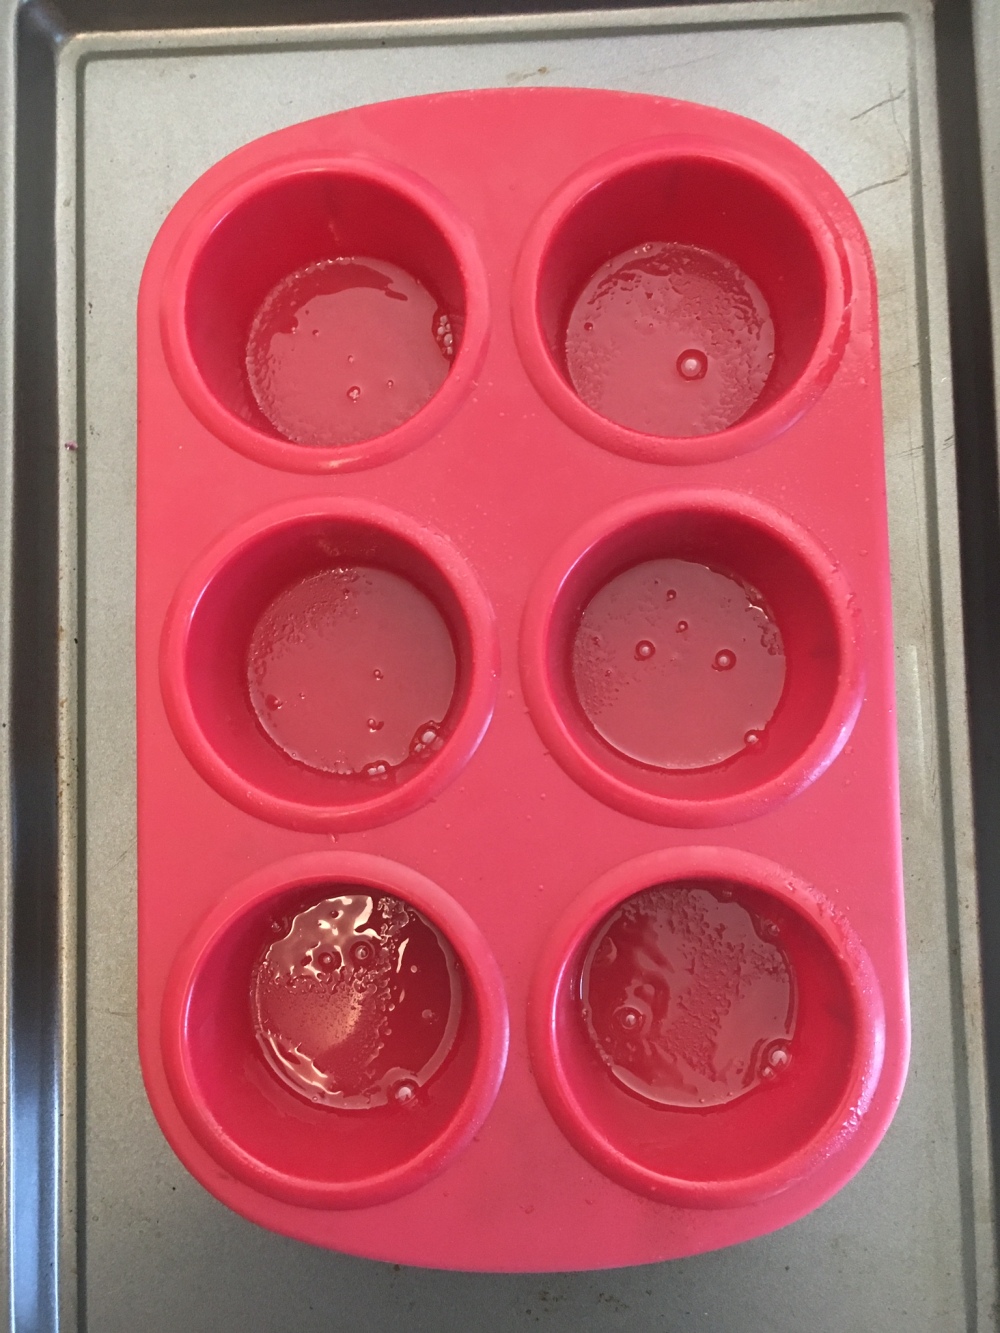
After you have beaten the eggs, you’ll want to assemble your muffin tin.
Spray the muffin tin with organic olive oil, or coconut spray.
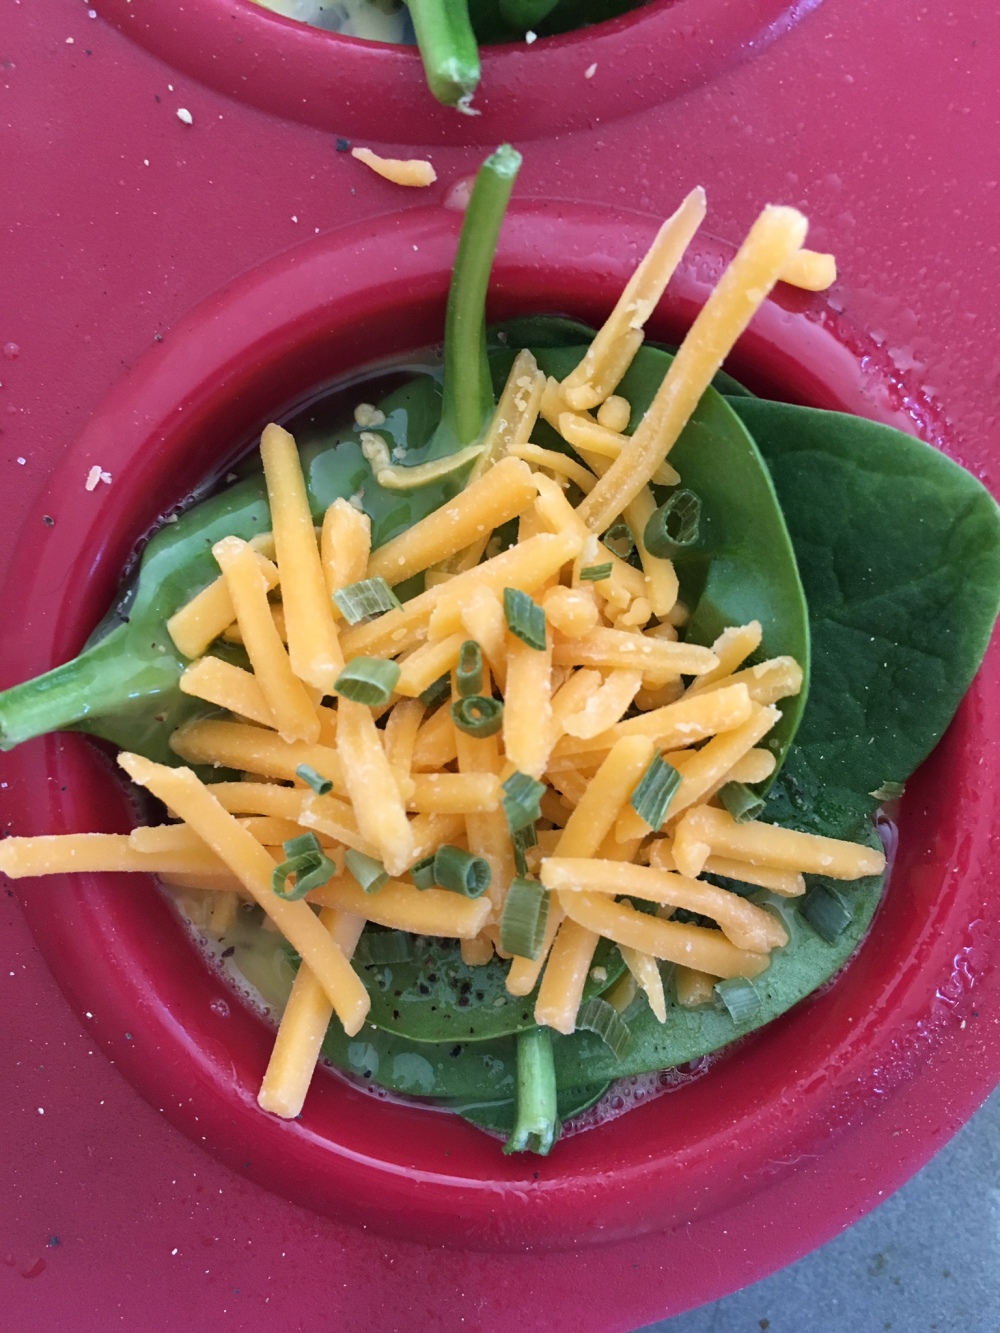
Next you’ll want to fill the cups with spinach!
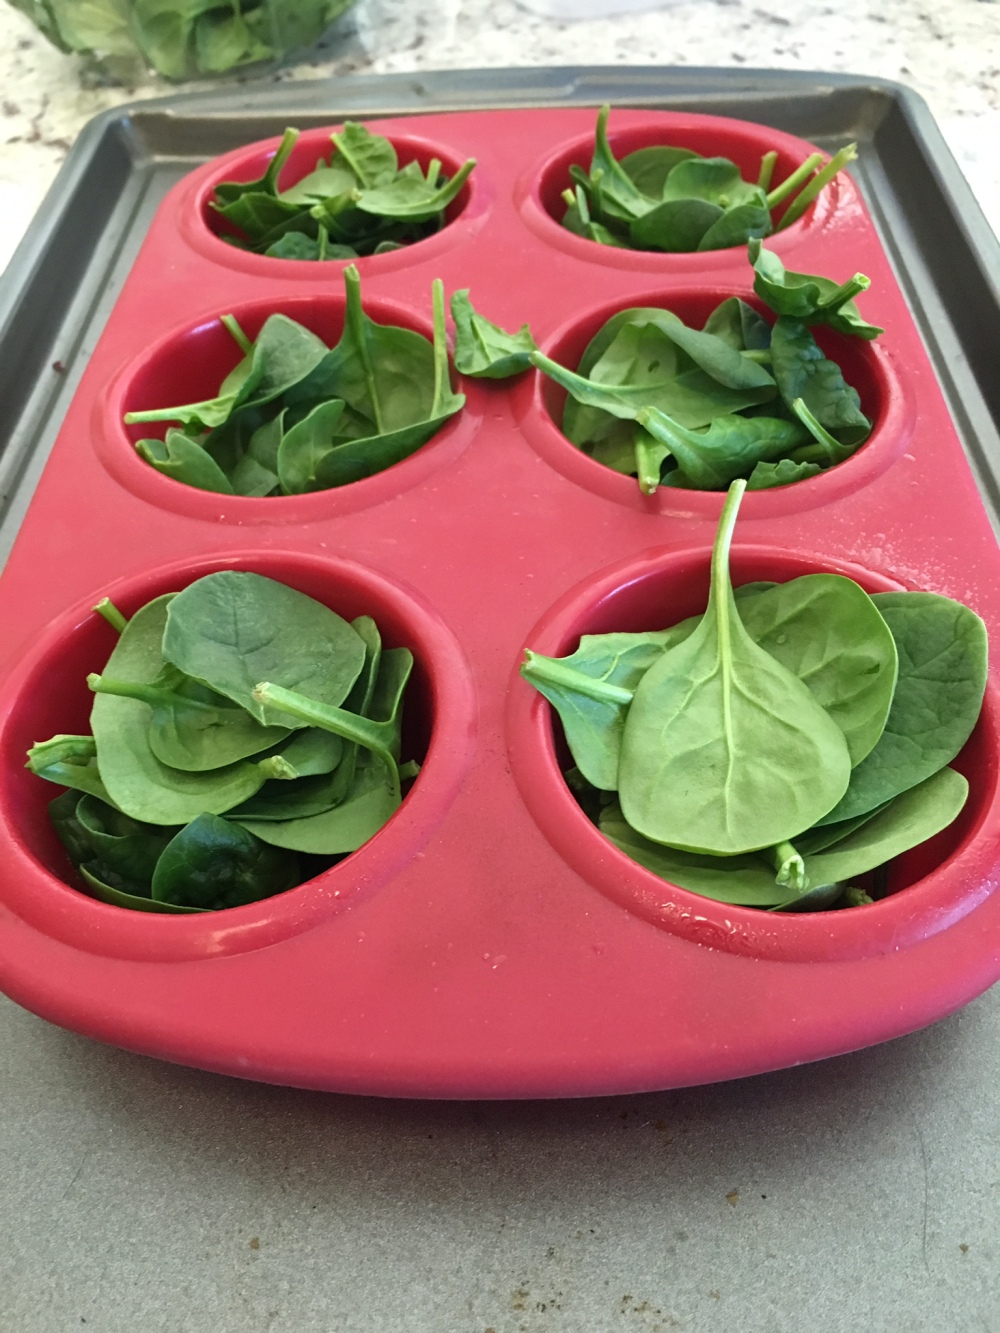
Just pack them full!
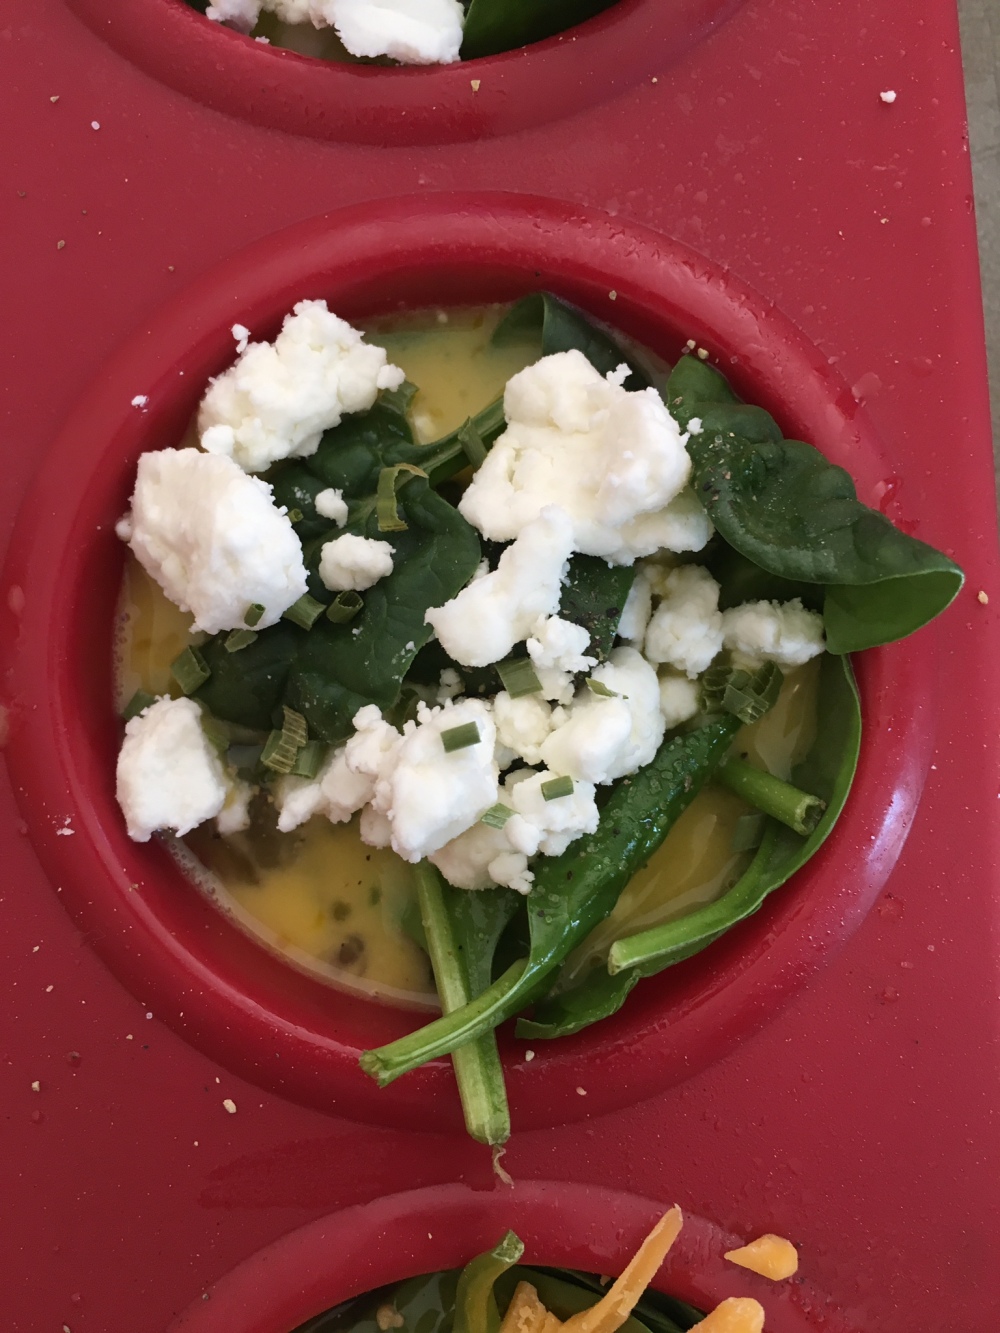
The next step is to fill the cups with the eggs! I use 8 eggs in this recipe because it seems to adequately fill the cups. They will expand a bit as you cook them. Feel free to use fewer, but I wouldn’t add any more or you may end up with a mess on your hands!
Now for the toppings!
We will end up with two varieties of egg muffins here! One with cheddar cheese, the others with goat cheese. Feel free to season with salt, pepper, and other herbs! We chose to add chives to these!
Once you have the cups assembled you’ll place them in an oven preheated to 350 degrees and cook for 25 minutes.
When your muffins come out of the oven they will look like this:
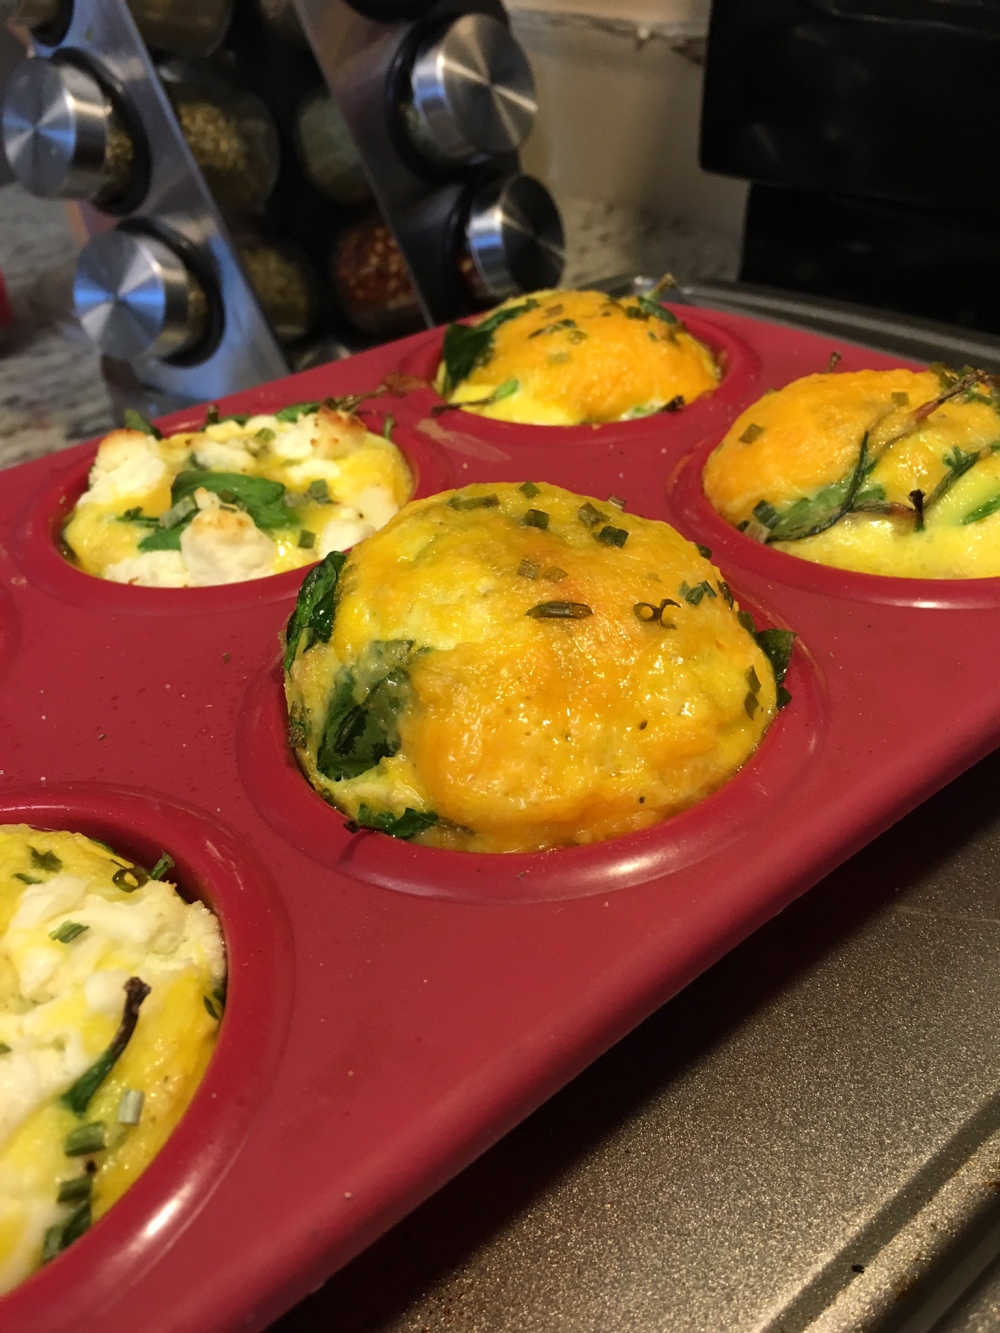
They will be be big and fluffy, but as they cool they will begin to “deflate.” This is normal, so once you’ve seen them deflate, don’t worry. They are perfectly fine!

Once they have cooled, place them in an airtight container and place them in the fridge. I will usually heat up two for breakfast and eat them on the way to work! Make sure they’re consumed in three days, otherwise you may want to throw them out.
Next up is a Cauliflower Crust Pizza!
A cauliflower crust pizza is a great way to satisfy a pizza craving, without all of the carbs! Once you’ve made the crust, the topping possibilities are endless!
The recipe for this pizza crust can be found here.
First you’ll begin with the crust!
Ricing the cauliflower is important as it is the bulk of your crust. If you’re not familiar with ricing, just think of it as blending or pulsing the cauliflower in the food processor until it resembles rice, or crumbs.
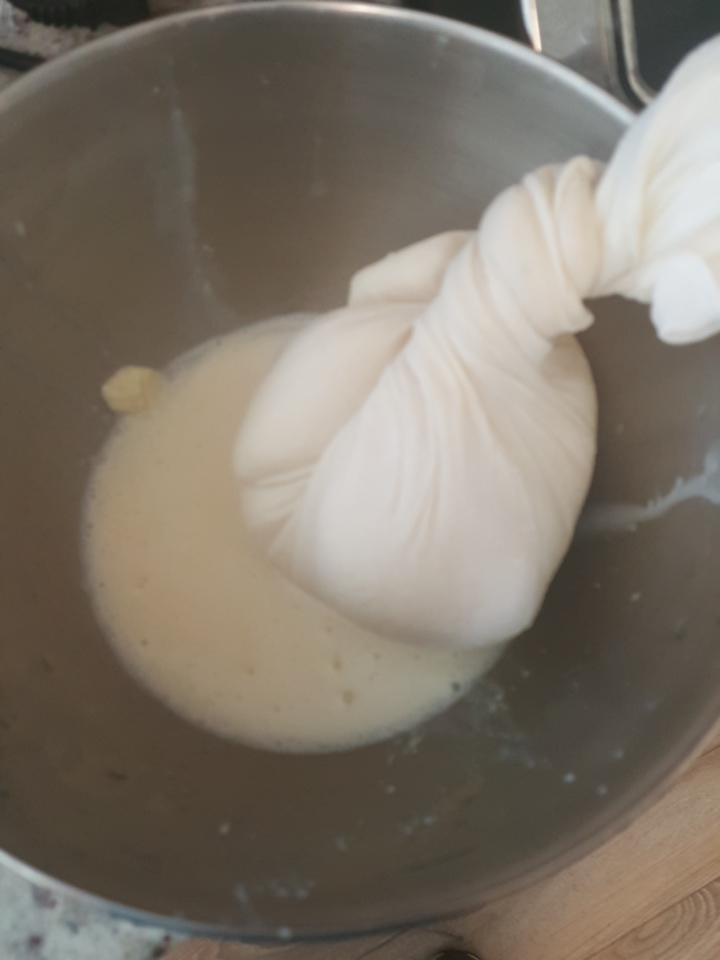
You will also want to get as much moisture out of the cauliflower as possible. The crust will not be as sturdy as that of a pizza with a bread crust, but you do want it to turn out somewhat crisp.
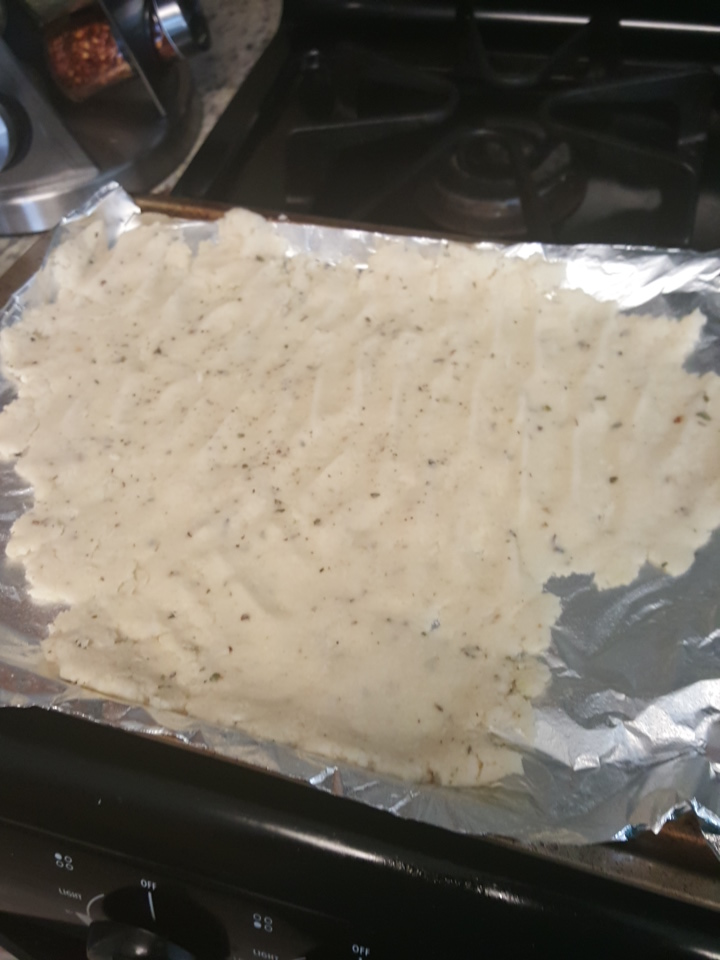
After the riced cauliflower has been heated for a few minutes, you’ll want to place the cauliflower in a tea towel and wring out as much of the excess moisture as possible.
After you have wrung out as much moisture as possible, you’ll then add your other binding ingredients such as the cheese, egg, and spices!
You’ll then place the crust on aluminum foil sprayed with oil and bake in an oven at 450 degrees for 15 minutes or until you notice the crust beginning to brown.
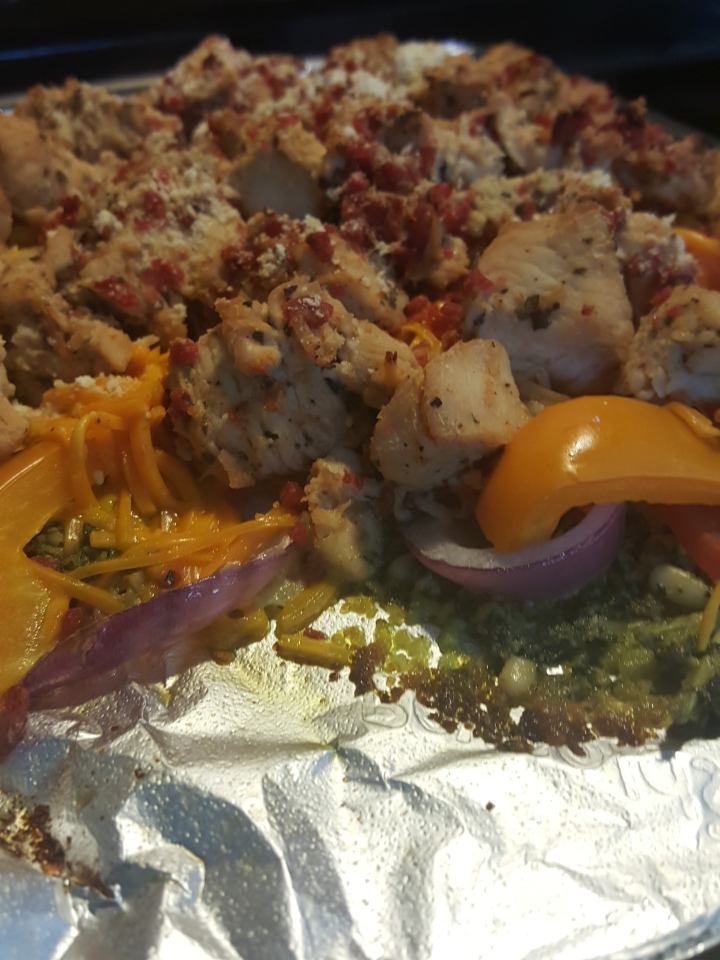
After the crust has been baked, you’ll want to place the toppings on it.
We chose organic chicken, veggies, fresh pesto, and vegan cheese for our toppings!
Once your toppings are assembled on your crust, place back in the oven and heat until the cheese is melted!
We did go heavy with our toppings for this crust, but that’s the fun of it! you can personalize it and make it your own!
Zucchini Pad Thai
If you’ve ever had Pad Thai, you know that you’re in for a dish with a rich, peanut butter based sauce. It’s usually slightly sweet, and many places will offer it with varying amounts of heat! This dish is different because we have replaced the noodles with zucchini!
Having made Pad Thai numerous times, I was excited to feature this recipe on the blog. I was also excited to find a peanut sauce recipe similar to mine in Dr. Joe Esposito’s book “Eating Right for the Health Of It”
I did change up the recipe only because I wanted it to fit the taste for Pad Thai.
Here is Dr. J0e’s recipe for Peanut Butter Sauce
1/2 cup tamari (Tamari is a gluten free soy sauce)
2 cloves garlic
1 oz. ginger, fresh
4 oz. peanut butter or cashew butter (Note: must contain just nuts or nuts and oil. Nothing else.)
1 cup peanut oil
1/4 cup sesame oil
1/4 cup rice vinegar
1/4 cup rice syrup
1 tsp crushed red pepper flakes
Mix together soy, garlic, peanut butter, rice vinegar, rice syrup and pepper in a food processor or blender. Separately mix sesame and peanut oil and slowly drizzle into soy base with mixer running until the mixture is emulsified. This is a very rich sauce, use sparingly.
After finding Dr. Joe’s recipe, I realized it’s not far off from what I have been using for my Pad Thai Sauce.
For this recipe, I omitted the peanut oil and rice syrup as I had not used them in previous batches of Pad Thai. I may try to use them in the future as I know they would contribute to flavor and a smoother texture, but even without those ingredients, the sauce was delicious! I did however add lime juice and some Sriracha for extra heat! I also used crunchy peanut butter, as I prefer pieces of peanut in my Pad Thai.

I did make sure to use peanut butter with only peanuts and oil. A little sea salt won’t hurt 🙂

Now you may be wondering how the zucchini was transformed into noodles. To create noodles from the zucchini I used a device called a spiralizer. It can be used to turn a variety of vegetables into “noodles.” There are many different types available, and most can be found at your local grocery store.

I used a spiralizer called the “Vegetti.” It is a handheld spiralizer.


Below is 4 zucchini transformed into noodles!

I have used zucchini noodles in spaghetti AND soup! The zucchini makes a great alternative to noodles in so many dishes! Now, back to the Pad Thai.

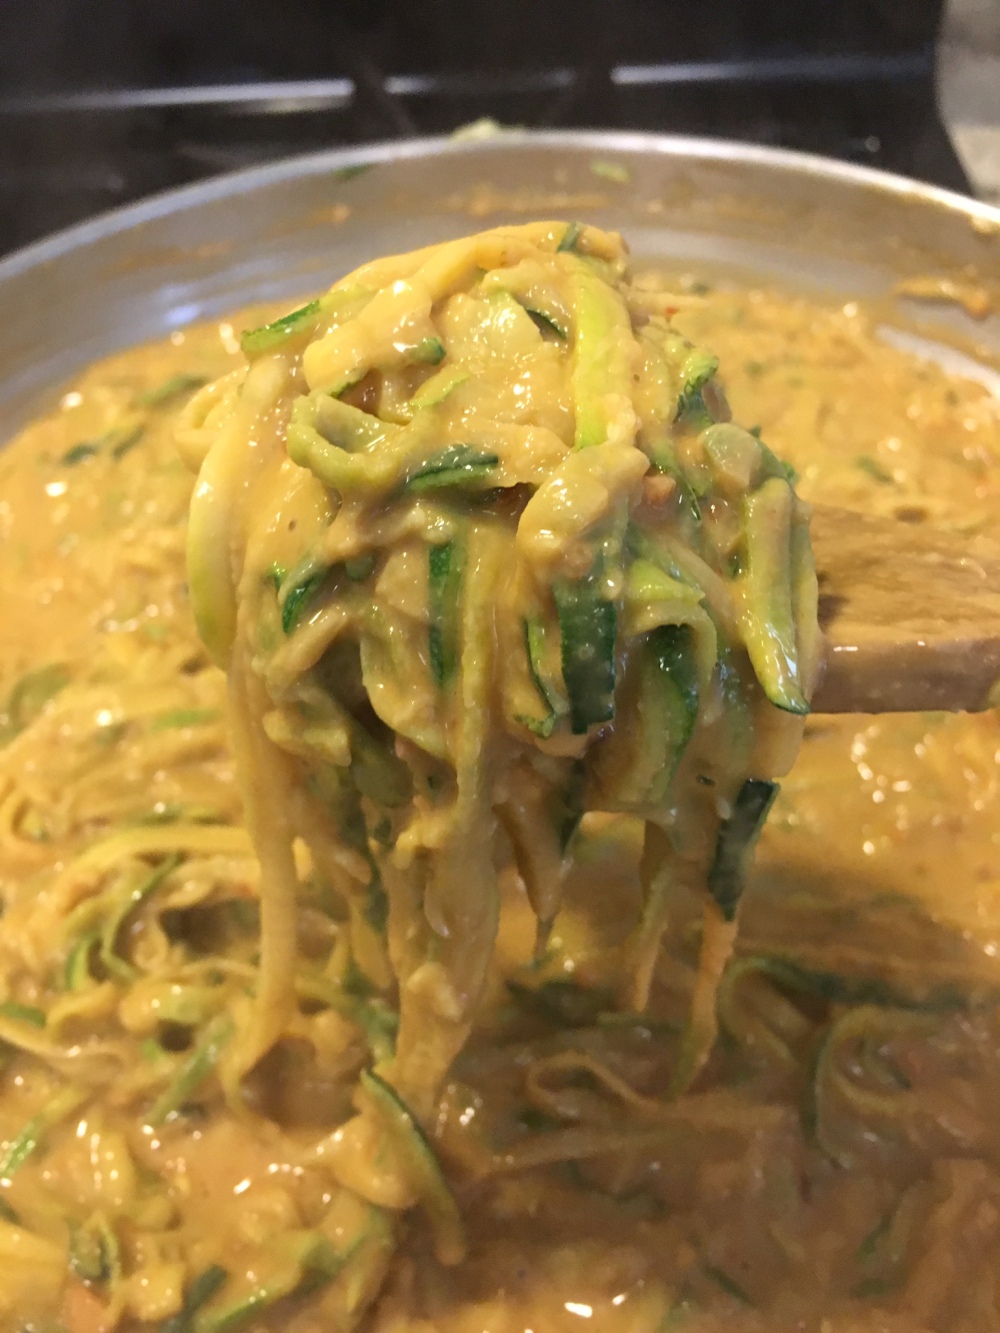
After heating some sesame oil in a large pan, place the zucchini noodles and saute for a few minutes. Personally, I like the zucchini to have a bit of crunch to it, but it can always be cooked to your preference!
After the “noodles” have had a chance to cook down, add the sauce, stir to mix, and cook until heated evenly.


Pad Thai is easy to customize as well! Feel free to add other vegetables or meat!
Now for dessert:
Black Bean Brownies

Now we know you may be thinking:”Why would I want black beans in my brownies?” Well…why not? These brownies certainly don’t taste like black beans, and they add nutrients that you wouldn’t get from eating a regular pan of brownies! You’ll still come out with a batch of delicious, fudgy brownies.

The recipe for the black bean brownies can be found here.

This is just as easy as making a regular pan of brownies! Combine all the ingredients in a bowl and mix! The only extra step required is blending the black beans in a food processor until they are smooth. After all ingredients are mixed well, place the batter in an oiled pan and bake in the oven at 350 degrees for 30 minutes.

The only suggestion we had for this recipe is the almond extract. It was good, but vanilla extract may taste better for this recipe.

And there you have it! We hope these recipes will inspire you to try some substitutions in your diet! These all taste great and are better for you!

Please feel free to comment with any questions about these recipes! More information about Dr. Joe Esposito’s book “Eating Right For The Health of It!” can be found online at drjoeesposito.com. Chiropractic and nutrition appointment information can be found on the website as well!
Don’t forget about our Leap Year Special going on where you can purchase 1 Cold & Flu Tonic, 1 Immune Booster, and a Dr. Joe Eating Right book for only $50!

Great recipes, thank you so much!
LikeLike
These are some great ideas. I am always trying to find some low carb ideas that taste good and are easy.
LikeLike